Comics /
Spotlight
Hellboy Drawing Tutorial
By
Michael Stewart
June 24, 2007 - 03:40
The thing I enjoy most about drawing hellboy is his face, mainly because of the textures that I can make up on his horns. I also like to capture that gritty monotone stare that seems so common with him. Anyways let's start showing you how to draw him!
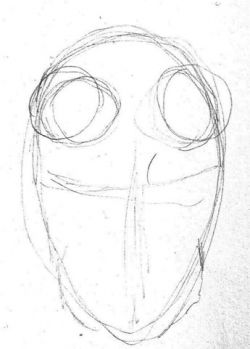
Step 1) I was shuffling through a couple hellboy pics, and noticing different styles, so I decided I'd do a more real than cartoony approach.
I started out with a really basic egg shaped head, and some loose circles indicating where I wanted to draw his horn stubs. Then I also kept in mind that hellboy has a very prominent jaw, so I put in some squarish lines around the bottom of this egg shaped head.
I always put a cross lines on my faces to remind me exactly where the eyes, nose and mouth will be, the mouth isn't too hard on this one since it's very wide and shaped more to his jaw.
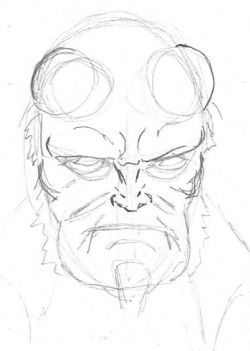
Step 2) Here is where I started thinking about what I wanted to structurally indicate first. I KNOW where his eyes will be so I put loose indicating lines to show where there will be shadows around his eyes, I also Put some harder lines down on his horns.
I add hair to both sides of the face, a beard indicator, and some curvy lines for the sides of the face, along with some muscles above the eyes.
These are of course really light lines(lighter that shown) and are all very eraseable. Some of which I will erase later.
Ok let's go to...
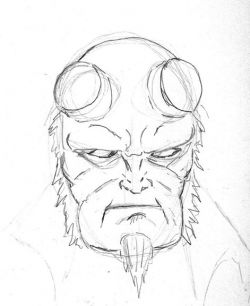
Step 3) This is where I lay down the dark lines showing what I know will be in the final drawing, and I am erasing the lines I don't want such as the sketchy lines around the jaw and the eyes.
I also put darker lines for the hair on the side of his face, because I know these lines are hair and can be more erratic than the face, I am not worried about them as much. The main focus here drawing the lines in the face that will be in the final drawing, and erasing those that won't.
and finally let's go to the last step...
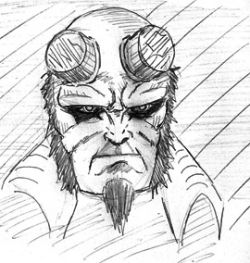
Step4) This is the final sketch. I erased both sides of the jaw bringing it to a narrower edge. Then I detailed the facial features, also shading in the areas that I know will be in shadow. Then I erased the useless lines around the horns and drew some nice rough lines to show that Hellboy's horns are cut.
I put in some directional lines behind hellboy to pop him out more, which is entirely unecessary, but it looked better!
Well I hope you learned something out of this brief Hellboy sketch tutorial!
Now go draw!
Email the author!.
Last Updated: July 2, 2026 - 07:01